
How to error proof your process by conducting a failure mode and effects analysis (FMEA)
By Olga Murdoch, UCD Agile
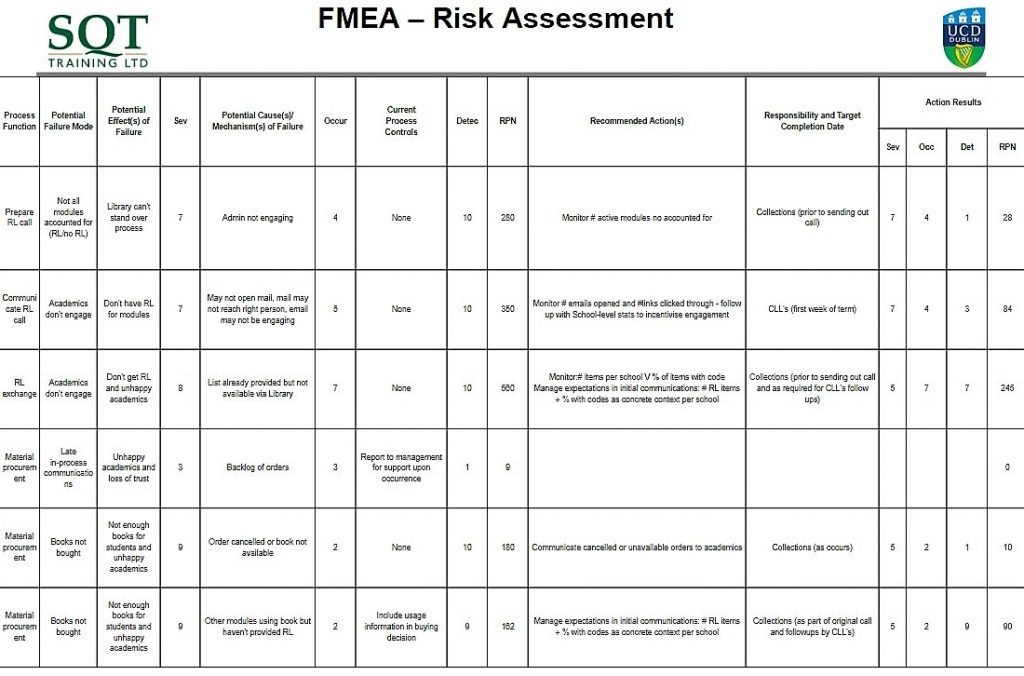
Figure 1 Sample FMEA from the Module Reading Lists project
What is a FMEA used for and why should someone use it?
A failure modes and effects analysis (FMEA) is a tool for assessing the risk of failure within a process. It is used to ensure effective design of new processes and/or to assess the risk in an existing process.
FMEA provides a structured approach to interrogating every step of a process with a view to proactively identifying risks. It enables the prioritisation of risks that should be addressed in the design, redesign or improvement of a process.
Directions on how to use it
Conduct a FMEA on your new or existing process by following the step-by-step instructions below.
This tool can be used by individuals but is most effective when used by a group of stakeholders involved in all aspects of the process. If working with a group, you might find affinity brainstorming a helpful way to gather group insights throughout the FMEA.
At the end of each step you will need to capture the information. If you are working with a group, this will be best done using a whiteboard. At the end you can transcribe it to a FMEA Template for tracking purposes. Click on the link to download FMEA Template.
Step 1: Understand the process
First, we need to have a common understanding of what the process is that we want to error proof. This could be a new or existing process. Map out the process from beginning to end. Make sure the purpose of each process step is clear to all involved in the FMEA.
List each process step in the first column of your spreadsheet.
Step 2: Identify all the potential failure modes
For each step in the process, pose the question “what are all the ways this could go wrong?”. These are your failure modes.
Every potential failure mode should be included at this point – no matter how likely you think it is to happen.
List each failure mode next to the relevant process step.
Step 3: Identify the potential effects of each failure mode
Now that all the potential ways the process could fail have been identified, try to identify the potential consequences for each individual failure. Ask the question “if this happens, what effect will it have on…. the purpose of this process step, people, related processes, systems, etc”.
List the potential effects next to the relevant failure mode.
Step 4: Identify all the potential causes of failure modes
We now know all of the potential failure modes and what the consequences of each could be. Next we need to consider what the potential causes of each failure might be. Ask the question “what might cause these failures to happen?”. Types of causes could be errors, people not behaving as expected, other processes not behaving as expected, etc.
List each cause next to the relevant failure mode in the spreadsheet.
Step 5: Identify the current controls in place for this failure mode
What tests or mechanisms are in place that either (1) prevent the failure mode from happening (reducing how likely it is to happen) or (2) when it does happen, prevent the effect of each failure from impacting the customer (reducing the severity of its impact)
List each control next to the relevant failure mode in the spreadsheet.
Step 6: Assess the risk for each failure mode
Now that we have a good understanding of what could go wrong and why, it is time to assess the potential risk each failure mode poses. To do this we need to calculate the risk priority number (RPN) for each failure mode.
The RPN is based on (1) how likely it is to occur, (2) how severe the consequences will be if it does happen, (3) if it does happen, to what extent can the current controls detect it has happened before the customer is affected. Provide a score from 1-10 for each as follows:
Occurrence: 1 = extremely unlikely; 10 = inevitable
Severity: 1 = insignificant; 10 = catastrophic
Detect: 1 = certain to detect; 10 = certain not to detect
List the score for each of the above next to the relevant failure mode in the spreadsheet.
With this information, we can now calculate the RPN for each failure mode. The calculation is as follows:
likely X severity X detect
Put the result of this calculation next to the relevant failure mode in the spreadsheet. You will likely see a range of numbers. The highest RPN’s are the one’s that need to be addressed with the greatest priority. The lowest one’s may not need to be addressed at all at this stage but should be kept in mind for future improvement efforts.
Step 7: Create a plan to mitigate the risks
The RPN’s that have been calculated make clear what risks need to be mitigated in order to design or improve the process. Select the failure modes you will address based on the RPN’s.
For each selected failure mode, identify the action that will be taken in order to improve the control such that (1) the error is prevented from happening – as much as possible; and (2) if the error does happen, it can be detected before its effect is felt by the customer – as much as possible.
Name an owner for each action and state the deadline. Ideally, those you need to act will have been involved in this analysis!
Finally, once the actions have been completed, go back to step 6 and recalculate the relevant RPNs.
What now?
Why not try out this tool yourself, and let me (olga.murdoch@ucd.ie) know how you get on.
Contact agile@ucd.ie for support on using tools such as this and others.