
How to use visual management to transform your team meetings
By Olga Murdoch, Agile Lead.
What is visual management used for?
Visual management is a lean approach to working where visual aids are used to manage operation and performance. Visual management tools can appear in many guises, but the one we are focussing on in this post is the visual management board (team board) as a means to improving team meetings.
Why should someone use it?
Using a visual management board to focus team meetings has benefits for both managers and team members. It can help to:
- Understand and indicate work priorities
- Create transparency across the team
- Identify what is being done (and done well)
- Identify when something is going wrong or not happening
- Cut down on meetings to discuss work issues
Directions on how to use it to improve team meetings
Step 1: Understand how team meetings currently work
It is always prudent to start with how things are now – if we really understand the current state of affairs we will be able to show with confidence how far we have come with any changes we make. In this context it is important to understand the purpose of the team meetings (with respect to the purpose of the team), how the meetings currently work, what currently works well (we don’t want to keep this value), and what currently does not work well (we want to remove this waste).
Step 2: Define categories of work
Established teams often already have clear categories of work that team members perform. If this is not the case you can define categories of work following a few simple steps:
- Each team member writes every piece of work they did in the past week (or other timeframe that makes more sense for your team) on a post-it (one piece of work per post-it)
- Using an affinity brainstorming approach – the team moves the post-its into groups of similar pieces of work
- Finally, the team reviews the resulting groups and gives each group a name – these names are your categories
Step 3: Create your teams visual management board
It is very important that the whole team is involved in creating the visual management board. This way there will be a sense of shared ownership over the board and the meetings. Craft your team board out of whatever material you have access to. Perhaps there is already a whiteboard in your office, or maybe you have some A3 flip-chart paper you can stick to the wall. Your first team board is not supposed to be pretty. It should be something that you are not afraid to change as your team – and your team meeting – develops.
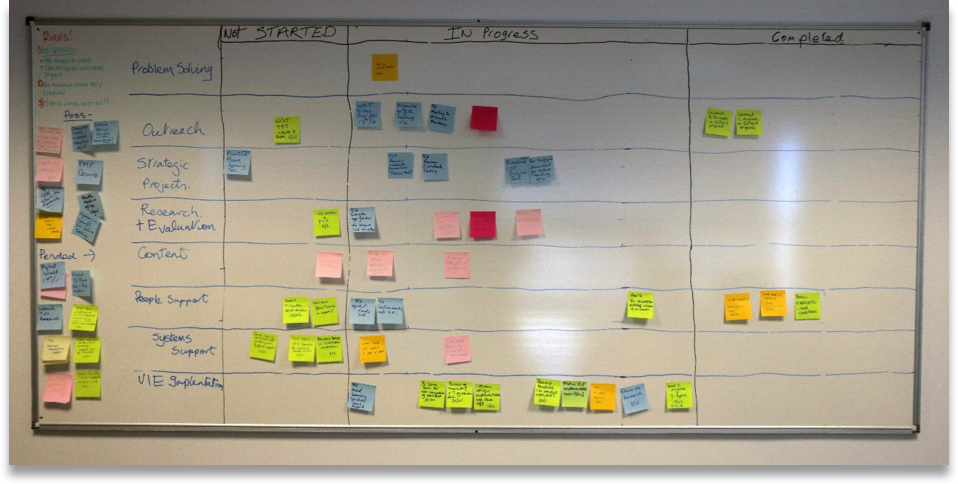
Split the team board into four columns (category, not started, in progress, completed)
Write each category down the left side and draw lines to create a grid as in this example from the Business eLearning team.
If there are two many categories for this to work, go back to Step 2 and refine the categories further.
Make sure to have enough supplies of post-its for running your team meetings. Depending on the size of your team, you might like to pick one colour for each team member so it is easy to spot who is doing what.
Step 4: Define the process – and the rules
Now that the team board is ready to go, the team meeting process and rules need to be defined. Key aspects to consider include frequency and duration. Make sure the process that is followed supports the purpose of the team meeting as defined in Step 1. Here is an example of how the process could work:
- Team meeting every day at 10am
- Each team member gets 2 minutes to give an update on their work tasks
- Giving an update includes moving items across the board as well as indicating why something isn’t moving
For the above process to work effectively, each team member should be moving some (at least one) item across the board during most meetings. This is where the size of a piece of work comes into play. If your team meets daily each piece of work should be completable within a single day. Each team member should start to break down larger pieces of work into smaller components so that they are able to show progress in each meeting.
The rules each team sets will differ depending on the dynamic of the team and the relationships within it. A good place to start is with ownership of the post-its. Nobody should move somebody else’s post-it. This not only ensures the team member feels ownership over their work, but it also helps to ensure respectful interactions during the meeting.
Step 5: Get started
Once the team board has been created and the team understands what is expected of them – there is nothing left to do but start. The first meeting will probably go way over time – but that is ok! Aim to have the team meeting running smoothly and keeping to time by the time you reach your 10th meeting – then celebrate the success with your team.
What now?
Once you are up and running with your team board it is quite easy to customise it as the team changes – and to add to it to get even more out of your team meetings.
Why not try out this tool yourself, and let me (olga.murdoch@ucd.ie) know how you get on.
Contact agile@ucd.ie for support on using tools such as this and others.